Pad Printing Pads, Pad Printing Supply, Silicone Molded Product

Connect on LinkedIn Connect on Facebook

Contact us today:
864-964-0900

  • Home
    • About Us
    • Meet the Team
  • Pad Printing Pads
    • Catalog: Round & Cone Shaped Print Pads
    • Catalog: Square and Rectangular Print Pads
    • Catalog: Roof Top & Elongated Print Pads
    • Catalog: Print Blankets
    • Catalog: Rotary Print Pads
    • Catalog: Custom Print Pads
  • Pad Printing Supplies
  • Marabu Printing Inks
  • Pad Printing Resources
    • Introduction to Pad Printing
    • Pad Printing Defined
    • Pad Printing Guidelines
    • Troubleshooting
  • Industrial Products
    • Silicone Molds
  • Impression Mats
  • News-Blog
  • Contact Us

Introduction to Pad Printing

.
The following paragraphs describe how ink is transferred from the image plate to the part to be printed on any standard type of pad printing machine.

Inking the Image

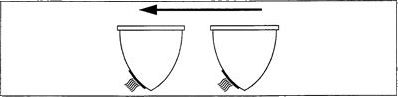
The ink cup pushes ink across the image plate (or cliche) that contains the engraved image, filling the image with ink. When the ink cup returns in the opposite direction, it removes the remaining ink (and outside the etching of course) from the plate. The solvents in the ink that remains in the etching evaporates. The evaporation of the ink solvents inside the etching causes the surface of the ink in the etching to get tacky.

Pad Printing Sequence 1

Picking Up the Image

The pad comes down to the plate and makes contact with the pad printing ink inside the etching. As the pad is compressed, it spreads, or rolls out, toward the edges of the image. This motion pushes aside the air that is above the ink film so the pad comes in contact with the ink. If the air cannot escape, air pockets remain between the pad and the picked-up ink film, which become visible as pin holes in the print.

Pad Printing Sequence 3

As the pad goes up, part of the tacky ink film inside the etching is picked up by the pad. The rest of the ink stays inside the etching.

Pad Printing Sequence 3

Transferring the Image to the Substrate

Once the pad picks up the image from the cliche, the pad moves horizontally toward the part to be printed (called the substrate). The pad is stopped in a horizontal position above the part to be printed.
While the pad is moving into position above the part, more solvents in the ink sticking on the pad evaporate, which makes the ink film get tacky again. It is this tackiness that makes the ink adhere to the substrate.

Pad Printing Sequence 4

The pad is pressed down on the substrate and the ink sticks to the surface to be printed.

Pad Printing Sequence 5

Returning to the Starting Position

The pad returns to its original position over the plate and is ready for the next print.

Pad Printing Sequence 6


NEXT: About the terminology – Pad Printing Defined

Send us an email:

Contact Us
Sending

Copyright © 2020

AccuPad Inc.
1324 Harris Bridge Rd.
Anderson SC 29621


Ph: 864-964-0900
Fx: 864-964-0206


Pad Printing Pads

  • Pad Printing Pads
    • Catalog: Round & Cone Shaped Print Pads
    • Catalog: Square/Rectangular Pads
    • Catalog: Roof Top & Elongated Print Pads
    • Catalog: Print Blankets
    • Catalog: Rotary Print Pads
    • Catalog: Custom Print Pads
  • Pad Printing Resources
    • Introduction to Pad Printing
    • Pad Printing Defined
    • Pad Printing Guidelines
    • Troubleshooting Pad Printing

Silicone Molded Product

  • Home
    • Industrial Product – Molded Components
    • Custom Silicone Molds
    • Impression Mats for the Belting Industry
  • Contact Us
    • About AccuPad
    • Meet the Team
    • Privacy Policy
    • Terms of Use

Credits

Publisher:
AccuPad Inc
Anderson SC

Webite and Hosting:
A.S.K.Web Solutions

Copyright © 2022 AccuPad Inc. · Website developed and maintained by A.S.K. Web Strategies, Anderson SC

Important

This site makes use of cookies which may contain tracking information about visitors.
By continuing to browse this site you agree to our use of cookies.

Customize Cookies ×